
|
Topics covered in this section:
SmartMove is about to get a major upgrade which incorporates many changes. This note describes those changes.
In summary, the changes affect the following areas:
These changes are described in more detail in the following sections.
An address may be entered in one of two ways:
There are three fields on the booking form. The first is for the prefix (1), the second is for the street name/place name (2) and the third is for the area name (3).
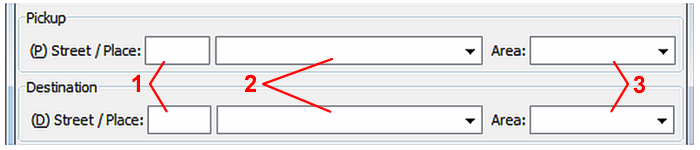 |
The area replaces the suburb field. In cities the area will normally be a suburb, but in the country an area might be a township or part of the main town. For examples:
A street name must have a prefix and a place name must not have a prefix. For examples:
It is no longer possible to enter any street or place name in the booking. Only names on the list of valid names can be entered – see Entering street names and place names below. This is primarily to avoid spelling mistakes in bookings.
SmartMove uses the location of the pickup address to allocate the job to a zone. Initially SmartMove does not know the location of any address and it gradually learns locations as they are used. Whenever a booked job is started SmartMove assumes that the location where the meter was turned on is somewhere near the pick-up address given in the booking. It uses the information to 'learn' the location of addresses.
There are times when a driver does not turn the meter on at the pick-up address and this can confuse the learning process. To eliminate this possibility SmartMove uses a number of actual pick-up at an address (when available) to learn that address. Normally the meter will be turned on somewhere near the correct location and SmartMove assumes that the true position is at the centre of these points. Any points that are wildly different are considered 'outliers' and are ignored.
The end result is that SmartMove will gradually learn the location of each address used. Very occasionally SmartMove may learn the wrong location for an address but it will correct the mistake when there are additional pick-ups at that address. Having the correct location will mean that the compass needle in the car will also show the correct distance and direction. It will also remove the situation where some addresses are dispatched to the wrong zone.
When making a booking only names and areas defined in the system can be entered. This is to avoid spelling mistakes.
The list of valid names can be edited by pressing the F11 key. Spelling mistakes can be corrected at any time by simply editing the existing entry.
The first page of names is the list of area names (4). For each area a default zone (5) and a default release (6) time need to be given.
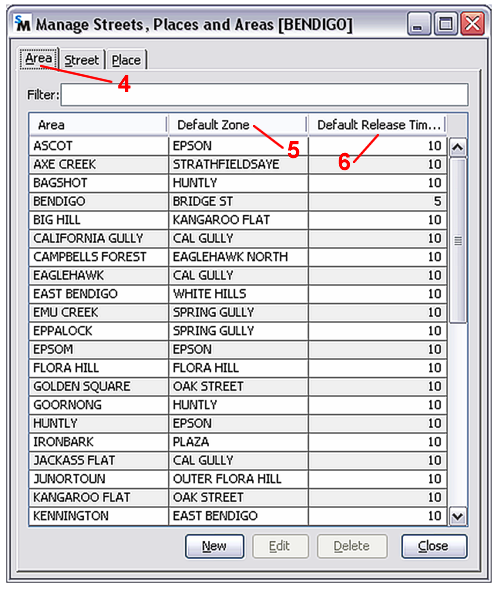 |
The default zone is the zone to be used for dispatching work when the address has never been used before. As soon as there is a pick-up at the address SmartMove will take that the spot where the meter was turned on to be the location of that address.
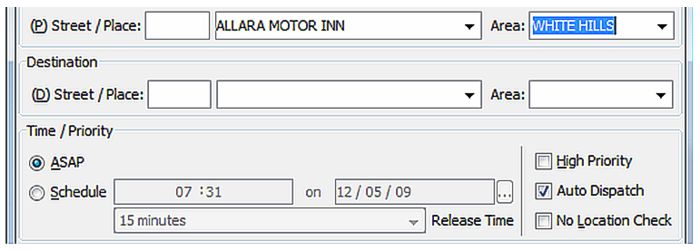
The default release time is the default release time to be used for pre-bookings in that area. Normally areas further away from the main operating area should have larger release times. In the example below WHITE HILLS has a default release time of 15 minutes.
 |
The second page of names is the list of street names (7).
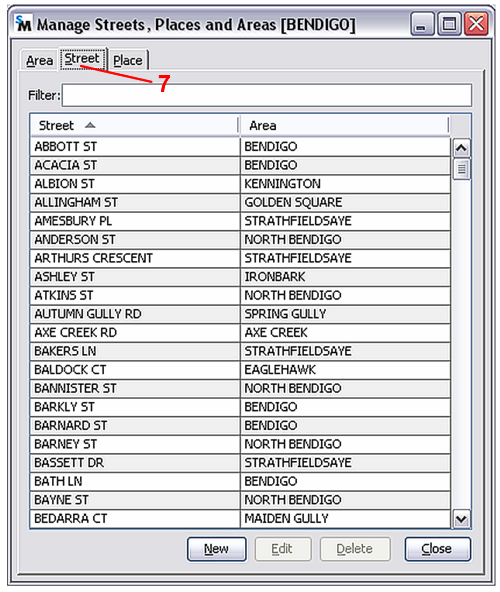 |
The area name is the name of an area that is associated with the street name. Note that a street may pass through a number of areas although none are shown in the example above. The names that appear here are the names that appear when a booking is entered.
 |
The place names are shown in blue and the street names are shown in black. In this example the prefix field has a red box around it as a place name has been selected and a prefix cannot be used with a place name.
Once a street has been selected an area name must be entered. If an area name is entered that has never been used with that street name before then the pair will be shown with a coloured border and the combination will be added to this list when the booking is made.
 |
The third page is for place names.
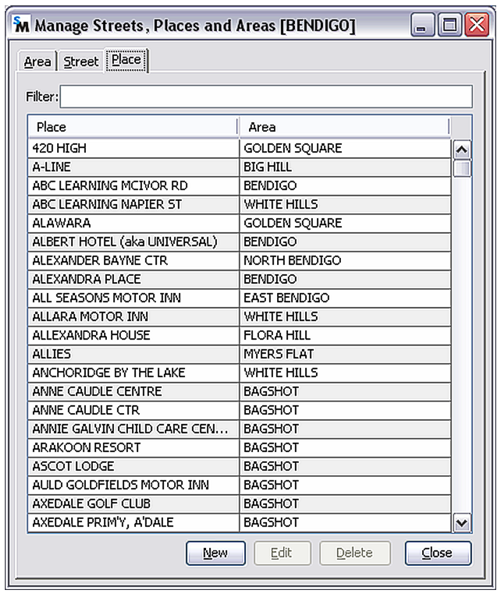 |
The place name/area names in the list will appear on the booking form when entering a booking.
 |
As with street names, a new area name may be given. In this case the place name/area name combination is added to the list.
It is now possible to have several pickup addresses in a booking and/or several drop-off addresses in a booking.
After entering a pickup address press F2 to add the address to the list of pick-up addresses.
After entering a destination address press F3 to add the address to the list.
 |
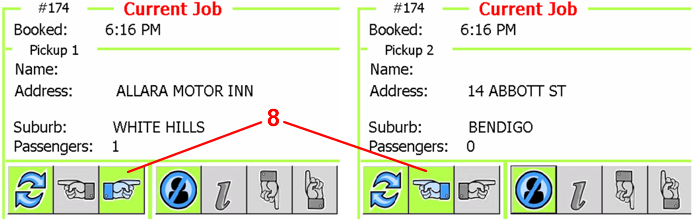
All the addresses entered will be sent to the vehicle and the driver uses the left and right (8) arrows to see the various addresses.
 |
Another major change in SmartMove is the introduction of booking attributes. A job can be given any number of attributes and the job will only be offered to drivers/vehicles having a matching set of attributes. The attributes available can be set for each fleet and will depend on local conditions. Typical examples are:
In addition it is possible to define one or more volunteer categories. These may be used for jobs that are voluntary in that some drivers may reasonably refuse to do the work. Typical examples are:
At the time of booking put a tick next to any attributes that are required and a cross next to any attributes that are definitely not required by clicking in the checkbox. The example below shows that a baby capsule is required but the vehicle must not be a maxi.
 |
Some attributes apply to drivers and are recorded with the driver information. At present these attributes can only be set by SmartMove support staff. Typical driver attributes are:
Some attributes apply to vehicles and are set using the Vehicle Properties option on the fleet administration website.
 |
In the vehicle the driver has some control over the work offered. A tick next to an attribute indicates that the driver is prepared to accept work with that attribute while a cross next to the attribute indicates that the driver is not prepared to accept work with that attribute.
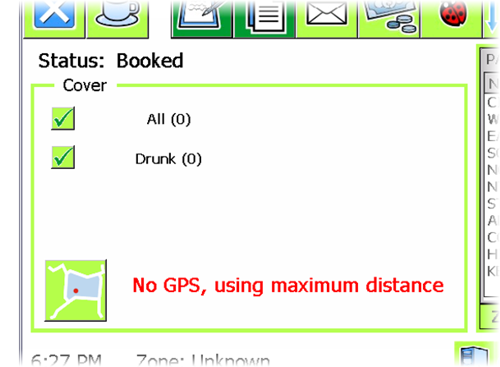 |
The vehicle also includes the attribute All. If the driver puts a cross next to this attribute then normal work will not be offered to the car. This can be used, for example, if a maxi vehicle does not want any sedan work and wants maxi work only.
If an attribute is ticked on the booking form then the following checking is done:
If an attribute has a cross on the booking form then the following checking is done:
If there is no tick or cross next to the attribute then that attribute is not considered at all. However if the driver has a cross next to the “all” attribute in the car at least one attribute with a tick must match before the job will be offered to a driver.
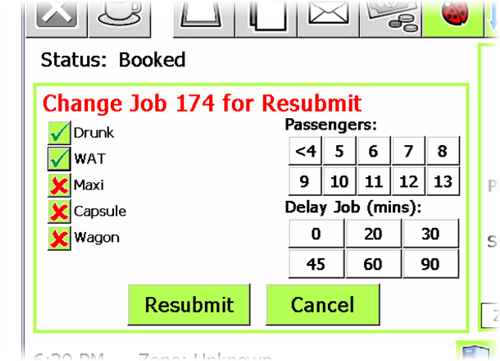
When a driver resubmits a job the driver has the option to change the attributes in the booking. The driver can also change the number of passengers and can specify a delay in the pickup time.
The original attributes are displayed and the driver can change any of them before resubmitting the job.
 |
The booking form has been completely revised. It is now in a separate window. This window will appear when the F2 button is pressed.
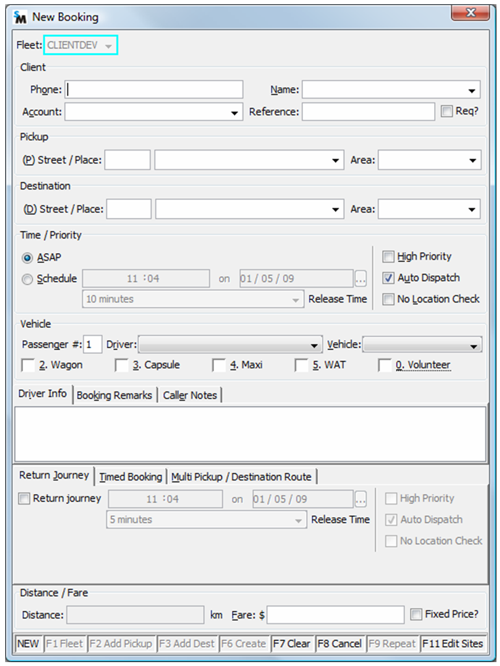 |
Note: Some fields are filled in automatically if SmartMove is linked to the phone system – see Phone System below.
The phone number field is normally supplied by the phone system but it can be typed in if available. If the phone number is provided then previous addresses used by callers with that phone number are displayed.
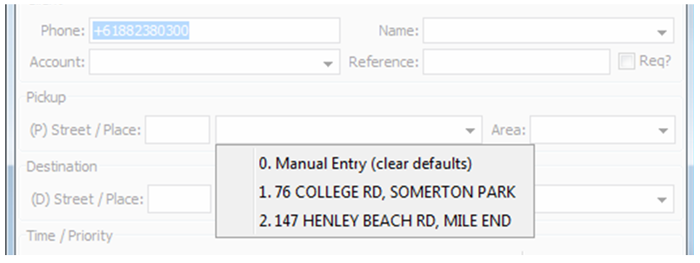 |
If the caller wants a previously used address, simply type the number shown on the left. Otherwise, hit the zero key and enter the pickup address in the normal way. If a previously used address is selected then the booking form is preset with the options used in the earlier booking for that address.
The name field is passed to the driver.
The account field can be entered as a number or as a name.
 |
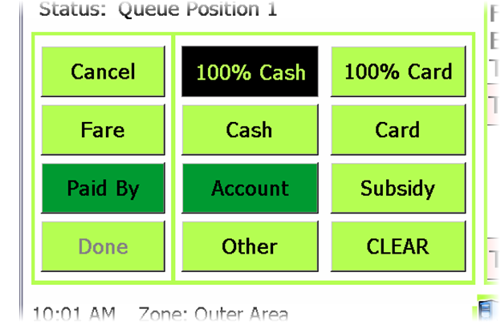
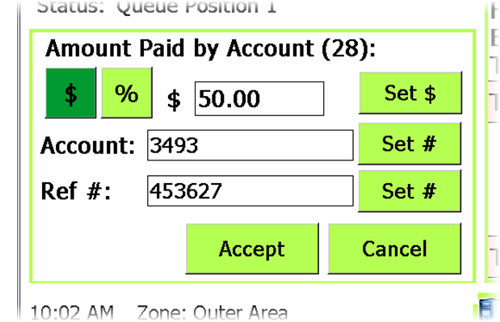
If an account is specified the account number is passed to the vehicle and the ACCOUNT button is highlighted on the fare payment screen.
 |
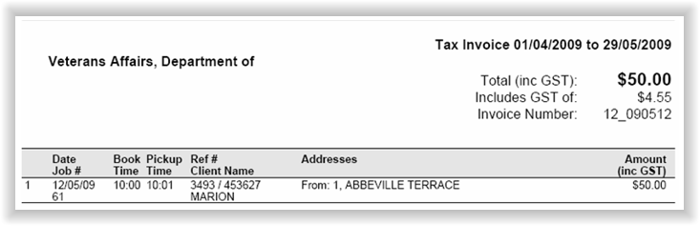
The reference field is optional and is passed to the vehicle. It appears on the account payment screen.
 |
It also appears on the final invoice to your account customer if you are using the DocketKiller feature.
 |
The pickup address must be entered in the format described in section Address Terminology above. Use the F2 button with each address if more than one is to be included in the booking. Predictive spelling is used but note that only names that are included in the address lists are allowed — see Entering Street Names and Place Names above.
The destination address is optional. It can be limited to the area name only, if preferred, but a full address must be entered if the “return journey” option is used — see below. Use the F3 button with each address if more than one is to be included in the booking. As with the pickup address, predictive spelling is used but note that only names that are included in the address lists are allowed
Use ASAP for as soon as possible bookings or select schedule and enter the pickup time and release time. The release time is preset to the default for the area given in the (first) pickup address — see Area Names above — but this may be changed. Either change the default value using F11 or change it in the booking itself.
Use the high priority option if the job is to be given priority over other work. Clear the auto dispatch flag if the job is not to be dispatched automatically by SmartMove. Set the no location check if the work is to be allocated to the first available car without considering the distance to be travelled to the (first) pickup address.
Set the number of passengers if more than four. The booking will be offered only to vehicles capable of handling at least the number of passengers given.
Use the driver or vehicle options if the booking is to be assigned to a particular driver or vehicle. Note however that the job will not be offered to anyone else if the driver/vehicle specified is not available.
The driver info field is used to set information sent to the driver. The booking remarks field may be used to record additional information about the booking that is not sent to the driver, while the Caller Notes field can be used to record information about the caller. They will appear next time the caller rings.
The Return Journey section can be used to book a return trip. This can only be used if a complete destination address is entered (as the last address) as this address becomes the pickup address for the return trip. Put a tick in the box next to 'Return Journey' then set the time.
The Timed Booking section is intended to be used when a vehicle is booked for a period of time. It is primarily intended for use by hire cars and is not implemented in the vehicle software yet.
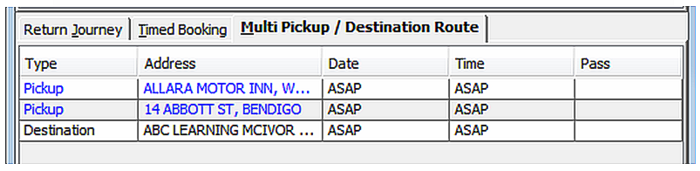
The Multiple Pickup/Destination Route section applies when the F2 and/or F3 buttons have been used to enter multiple addresses. At present all the pickup addresses are shown first in the vehicle followed by the destination addresses but in future the addresses will be shown in the order they were entered.
The Distance field is not currently used.
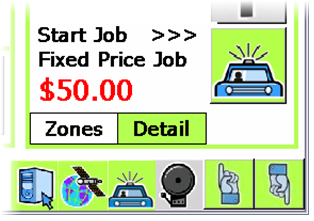
The Fare field is intended to be used for fixed price (non-metered) jobs. Any amount entered here appears in the vehicle.
 |
 |
The booking software can now be linked to some phone systems* to use the caller’s phone number as part of the booking process. The benefits are that addresses previously used by that number are offered and the booking is preset with various fields from the previous booking.
|
* It may be possible to link SmartMove to your existing phone system. It depends on the capability of the system you have. There is usually some effort (and cost) involved in doing this integration. It is unlikely your existing phone system will provide the capabilities proposed for the SmartVOIX system. >
SmartMove is also offering an ISDN phone system that is fully integrated with SmartMove. The system is being developed in stages; available now is the option to pass the caller id through to SmartMove so that addresses can be offered.
Future releases of the phone system will provide the following features (roughly in the order they are expected to be delivered):
When a job is first entered it is put in the new pending queue. It normally stays there for one minute. This is to allow the booking number to be obtained if it is required.
If there is no connection to the server the booking will stay in the pending queue indefinitely. When connection to the server is restored jobs in the pending queue can be sent to the server using the activate button. This means that bookings can be taken even when there are temporary problems with the server or the internet connection.
If the connection to the server is lost for an extended period of time the pending queue can be used for manually dispatching work. Jobs can be removed from the list using the cancel button once they have been dispatched.
The search panel has been completely revised.
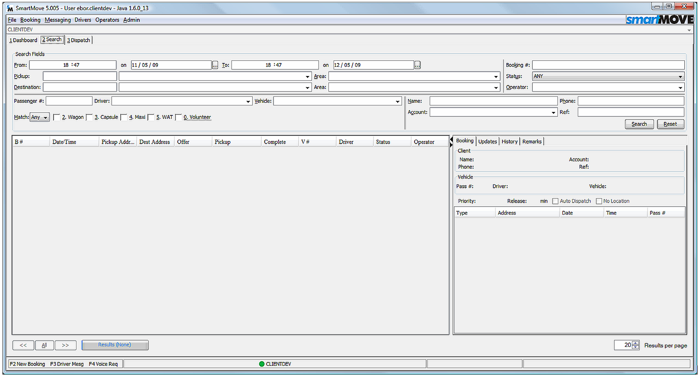 |
Changes made include:
The search now has only one line for each matching booking. If either the vehicle id or the driver id is in bold then the work has been manually allocated to that vehicle/driver.
Click on a line to see the details on the right hand side. The information displayed is similar to that available on the main dispatch screen and includes the complete history for the job.
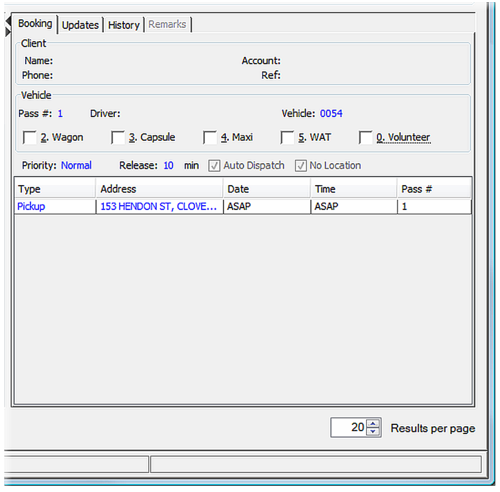
The booking panel gives the main booking details, including the attributes, any manually assigned driver or vehicle, and the pickup and destination addresses.
 |
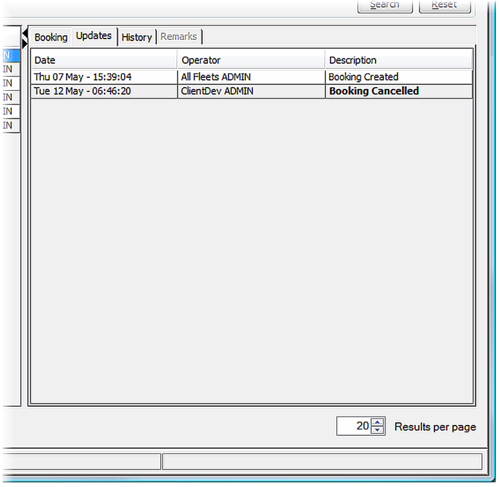
The updates panel gives the history of changes to the booking, including any changes made by a driver when resubmitting the job. Hold the mouse over any information shown in bold to get additional information
 |
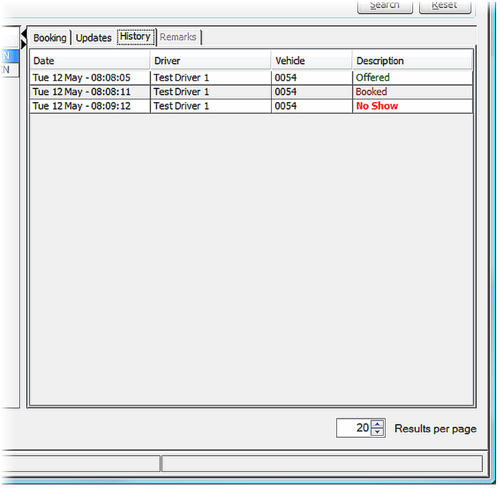
The history panel shows the history of the job. Hold the mouse over any information shown in bold to get additional information.
 |
Minor changes have been made to the dispatch screen. Changes include:
 |
![]() back to the top of the page
Dashboard
back to the top of the page
Dashboard
This page replaces the original booking form and includes the information that was previously in the bottom right hand corner of that form. It is primarily intended for multi-fleet call centres.
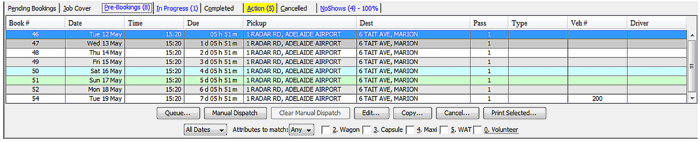
It shows the status of each fleet (number of jobs on cover, in progress and in the action queue) as well as jobs that have been waiting more than the time specified with the slider at the top of the screen.
 |
The bottom part of the screen shows the jobs that are in the pending queue for each fleet. These are jobs that have been entered recently or which have not been sent to the dispatching server for some reason.
There have been a number of changes to the vehicle software. Note that these changes will be released separately from the changes to the booking form described above. The vehicle changes include:
You can rearrange sections of the booking form if you wish. Click on File/Settings then click on Reorder panels in the Booking Form
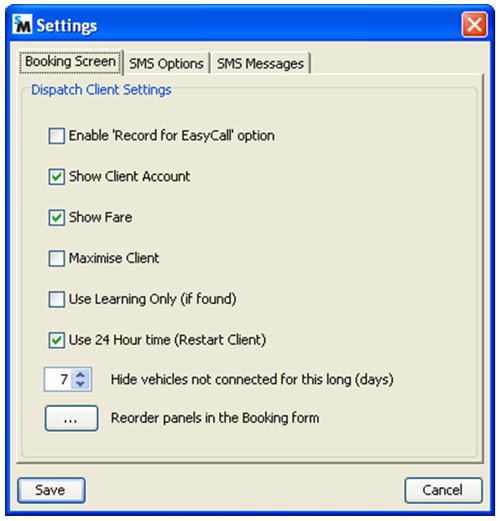 |
You will then get a screen with the sections of the booking form marked in blue.
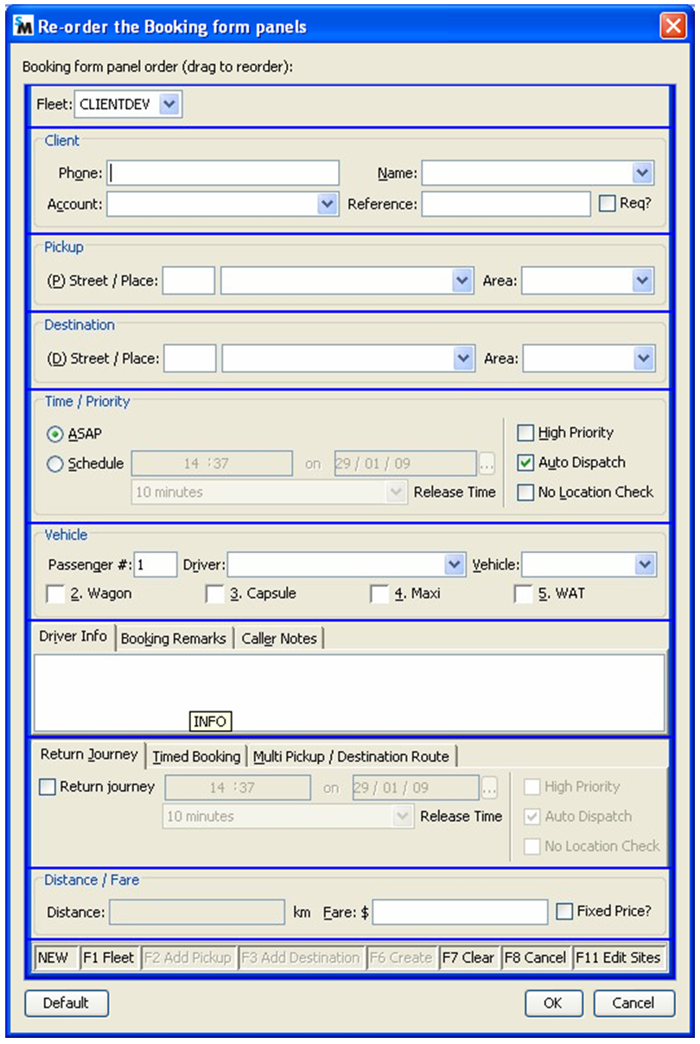 |
Move sections of the form up or down by holding the left mouse button down as you move the mouse. Click on OK when you are happy with the changes or press Cancel to clear all the changes. Click on Default if you want to reset the form to the layout originally supplied.