
|
| index > usb install |
These notes describe how to re-install the SmartMove vehicle software on a Mobile Computer Terminal (MCT) unit from a USB flash memory key (USB key).
This should normally only be done when the unit has failed or when requested by SmartMove Support.
Download the SmartMove_vX_YZ.zip file onto the USB key. The vX_YZ represents the version number (e.g. v4_52).
If not already done, using Windows Explorer, open the folder showing the contents of the USB key.
If you use a third party compression utility (e.g. WinZIP, 7Zip or IZArc) use it to extract the files onto the USB key.
If you do not have a third party compression utility installed, you will have to extract the files using the inbuilt Windows compression utility by perfornming the following steps:
The USB key is correctly set up when root folder of the USB key contains a file named SmartMoveBoot.run and a folder named SmartMoveVehicle.
Safely remove the USB key from the computer.
Section 1a should be followed if installing SmartMove on to a Waveon.
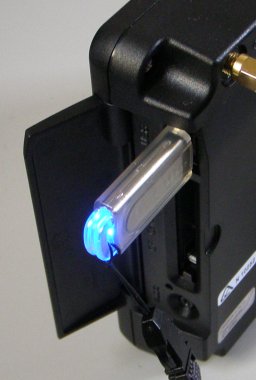
Open the flap on the right side of the Waveon screen to expose the USB port.
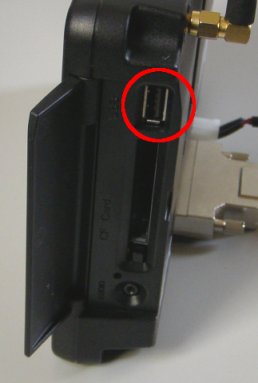
Insert the USB Drive into the USB port.
Note: at this stage it doesn't matter if the Waveon is on or off.
Restart the Waveon by pressing the small button at the back (top left) of the screen.

Proceed to step 2.
Note: the Waveon may not detect some brands of USB keys upon startup which results in SmartMove starting up even with the USB key plugged in. If you experience this issue, then restart the Waveon but this time hold down Button 4 at the front of the Waveon until you see Windows (not SmartMove) start up. The USB key should then be detected.
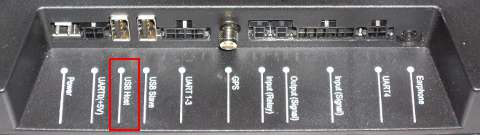
Section 1b should be followed if installing SmartMove on to a SmartMove UCAST unit.
On the base of the unit, identify the USB Host and USB Slave ports. Insert the USB key into the USB Host port.
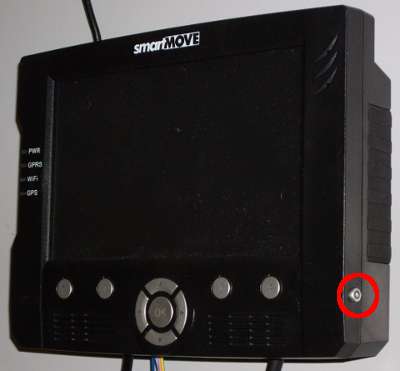
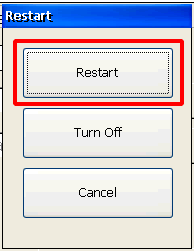
Restart the unit by pressing the button on the right side to bring up the Restart dialog box and then pressing the Restart button.
Proceed to step 2.
When the unit starts up, the files on the USB key should be detected and the dialog box below will be shown.
Note: It may take a minute or so for the dialog box to appear. Do not remove the USB key during this time.
Note: If the dialog box fails to appear and a Windows desktop is instead displayed, refer to Install the SmartMove Vehicle Software (Alternative Method) below.
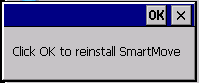
Click on the OK button and wait for the installation procedure to be performed.
After the installation procedure has been completed, the below dialog box will be displayed. Remove the USB key and then click the OK button. The unit will be restarted.

After the SmartMove Vehicle software has started up, it will be necessary to configure the software for the vehicle it has been installed into. See the Configuring SmartMove for a Vehicle section below, for instructions on how to configure a unit.
Note: that the documentation below assumes that the unit is connected to a mobile phone network (if you're not sure, see Determining server connection status below).
If the panel where the vehicle is configured is not being displayed, tap the GPS icon (circled in the screenshot below) and then tap the Config tab.
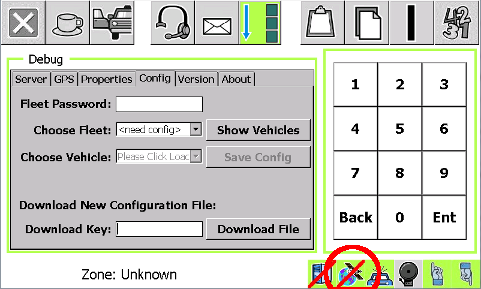
Tap in the Download Key text box so a cursor is displayed in the text box and a number pad is displayed on the right.

Use the number pad to enter the download key for the fleet. If you don't know the download key for the fleet, please contact SmartMove support.
After the download key has been entered, tap the Download File button. Downloading the file can take up to 40 seconds. Wait until 'File Downloaded Successfully' is displayed. You will now be able to select the fleet.
Tap on the Choose Fleet drop down list box and then tap on the correct fleet to select it from those listed.
If a password is required for a fleet, tap the Fleet Password text box so that the cursor is displayed in it and enter the password using the key pad on the right.
Note: Most fleets don't use a password. If a password isn't required, then the Fleet Password text box should be left empty.
Tap the Show Vehicles button and wait until the Choose Vehicle drown down list box changes from 'Please Click Load' to 'Please Select'.
Tap on the Choose Vehicle drop down list to display the list of vehicles. Tap on the correct vehicle. If the vehicle is not displayed, try scrolling up or down the list.
Tap the Save Config Button and wait for the Login panel to display. SmartMove is now configured for the vehicle.
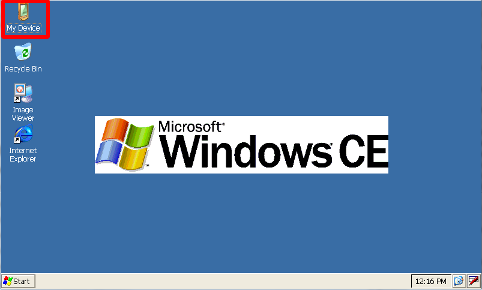
If the Install the SmartMove Vehicle Software step fails, the unit may display the Windows CE desktop shown below. Follow these instructions only if this display stays on the screen for over a minute.
Insert the USB key (see Insert the USB key into the Waveon above).
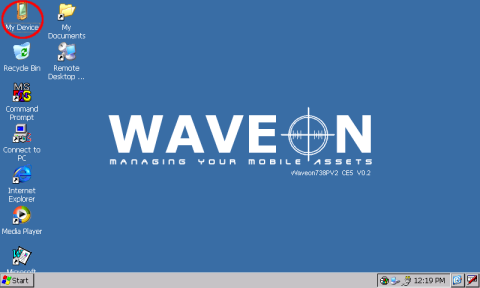
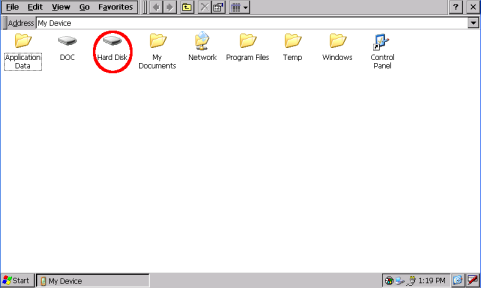
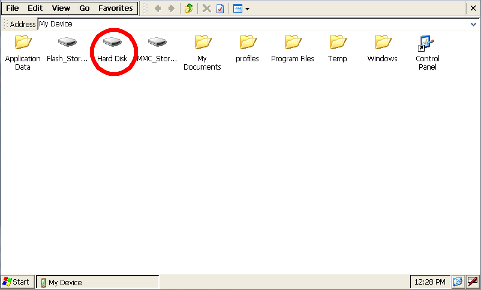
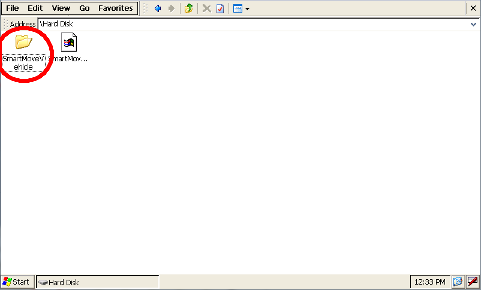
Double tap on the My Device icon then double tap on the Hard Disk drive icon.
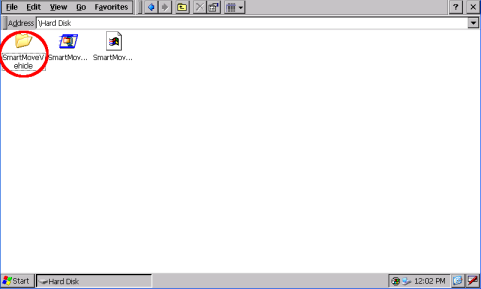
Double tap on the SmartMoveVehicle directory icon.
Insert the USB key (see Insert the USB key into the SmartMove UCAST unit above).
Double tap on the My Device icon then double tap on the Hard Disk drive icon.
Double tap on the SmartMoveVehicle directory icon.
Double tap on the Reinstall.SmartMove icon.
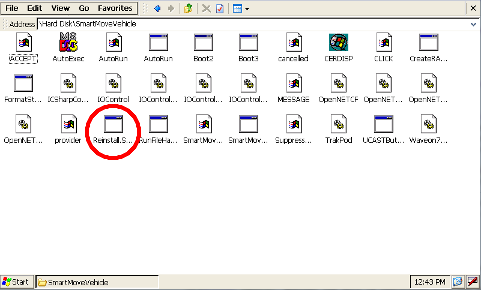
The installation should run and display the following dialog box:
Click on the OK button and wait for the installation procedure to be performed.
After the installation procedure has been completed, the below dialog box will be displayed. Remove the USB key and then click the OK button. The unit will be restarted.
After SmartMove starts up, the unit will need to be configured for a Vehicle.
The Debug - Server panel shown below provides some information about a MCT unit's connection to the mobile phone network and the SmartMove server.
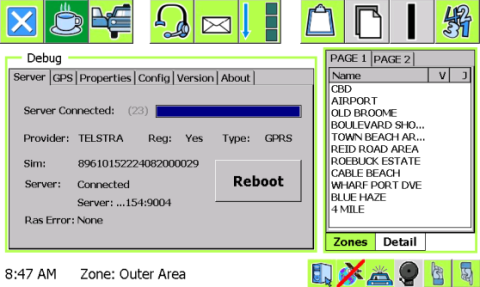
Information includes: